文章目录
  1. 1. 简介
  2. 2. 准备环境
  3. 3. HelloWorld
    1. 3.1. 服务提供者
    2. 3.2. 实现服务
    3. 3.3. 启动服务
    4. 3.4. 服务消费者
    5. 3.5. 验证服务
    6. 3.6. 直接连接

Dubbo是阿里多年前开源的一套服务治理框架,在众多互联网企业里应用广泛。它的文档也非常全面。本文将会大致介绍dubbo的思想,旨在快速上手自己搭建一套服务。

简介

Dubbo是当服务数量很多的时候,用来解决服务治理的问题。服务治理包括服务编排、服务路由、服务发现等一系列功能。它的用户指南里介绍得很清楚了,这里就不再赘述了。Dubbo支持多种协议来进行远程调用,但是并不支持REST方式。当当在dubbo的基础上开发了dubbox(Dubbo eXtensions),支持REST风格远程调用

本文将会创建一个dubbo的服务提供者,注册到zookeeper服务注册中心,然后创建一个服务消费者,通过dubbo协议调用服务提供者的方法。下一篇文章将会介绍在dubbo里使用dubbox提供的REST服务。

准备环境

首先请自行安装Java、Maven和喜欢的IDE。我用的是Intellij IDEA社区版。Dubbo可以使用Zookeeper来作为服务的注册中心,所以可以自行安装Zookeeper。我这里用Vagrant启动了一台已经安装过Docker的Ubuntu虚拟机,它的IP是192.168.33.88,可以用以下命令来直接启动Zookeeper容器来提供服务:

1
docker run --name=zk -d -p 2181:2181 -p 2888:2888 -p 3888:3888 jplock/zookeeper:3.4.8

接下来新建一个Maven工程helloService,再给它添加两个Module,分别为helloApi(接口和模型,被消费者所依赖)和helloImpl(实现,依赖helloApi)。GroupId随意设置便可,我填的是org.ggg.dubbo。工程创建好了应该是这样的:
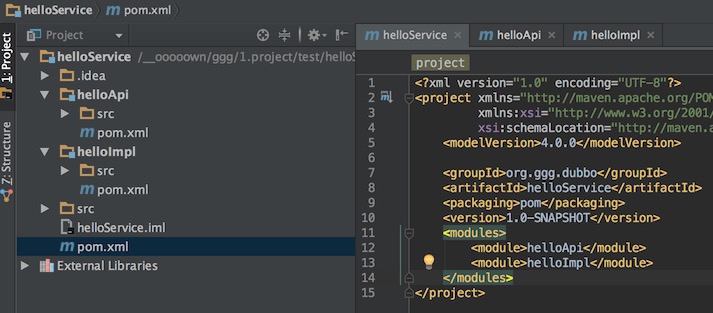
HelloWorld

服务提供者

一切就绪,开搞。首先给helloApi添加一个服务提供者:

1
2
3
4
5
package org.ggg.hello.service;
public interface HelloService {
String sayHello(String name);
}

很简单,只是提供了一个sayHello的接口。

实现服务

接下来就要在helloImpl里实现这个服务了:

1
2
3
4
5
6
7
8
9
10
package org.ggg.hello.service.provider;
import org.ggg.hello.service.HelloService;
public class HelloServiceImpl implements HelloService {
public String sayHello(String name) {
return "Hello " + name;
}
}

为了编译通过,需要在helloImpl里添加对helloApi的依赖。

启动服务

为了启动我们的hello服务,我们需要依赖spring。先往helloImpl的resource里增加spring的配置文件provider.xml:

1
2
3
4
5
6
7
8
9
10
11
12
13
14
15
16
17
18
19
20
21
22
<?xml version="1.0" encoding="UTF-8"?>
<beans xmlns="http://www.springframework.org/schema/beans"
xmlns:xsi="http://www.w3.org/2001/XMLSchema-instance"
xmlns:dubbo="http://code.alibabatech.com/schema/dubbo"
xsi:schemaLocation="http://www.springframework.org/schema/beans http://www.springframework.org/schema/beans/spring-beans.xsd http://code.alibabatech.com/schema/dubbo http://code.alibabatech.com/schema/dubbo/dubbo.xsd">
<!-- 提供方应用信息,用于计算依赖关系 -->
<dubbo:application name="hello-world-app" />
<!-- 使用zookeeper注册中心暴露服务地址 -->
<dubbo:registry protocol="zookeeper" address="192.168.33.88:2181" />
<!-- 用dubbo协议在19880端口暴露服务 -->
<dubbo:protocol name="dubbo" port="19880" />
<!-- 声明需要暴露的服务接口 -->
<dubbo:service interface="org.ggg.hello.service.HelloService" ref="helloService" />
<!-- 和本地bean一样实现服务 -->
<bean id="helloService" class="org.ggg.hello.service.provider.HelloServiceImpl" />
</beans>

然后往helloImpl里增加一个入口:

1
2
3
4
5
6
7
8
9
10
11
12
package org.ggg.hello.service.provider;
import org.springframework.context.support.ClassPathXmlApplicationContext;
public class Provider {
public static void main(String[] args) throws Exception {
ClassPathXmlApplicationContext context = new ClassPathXmlApplicationContext("provider.xml");
context.start();
System.in.read();
}
}

这时候需要增加spring和dubbo的依赖了。我用的是org.springframework:spring-context:4.2.4.RELEASEcom.alibaba:dubbo:2.5.3。安装完依赖,就可以直接运行Provider了。要是一切顺利,应该看不到错误信息了。在安装zookeeper的虚拟机上,用以下命令可以连接上zookeeper:

1
docker exec -it zk bin/zkCli.sh

用以下命令应该能看到多了dubbo的路径:

1
2
3
4
5
ls /
ls /dubbo
ls /dubbo/org.ggg.hello.service.HelloService
quit

这就证明我们的dubbo已经连接到zookeeper的服务注册中心了。

服务消费者

服务提供方已经搞定,然后就该是服务的消费者了。按理来说消费者应该是另一个项目,这里为了简单起见,我们姑且认为消费者是一个测试。首先在helloImpl的test文件夹里增加一个resources目录,标记为Test Resources Root。往里新增一个文件consumer.xml:

1
2
3
4
5
6
7
8
9
10
11
12
13
14
15
16
<?xml version="1.0" encoding="UTF-8"?>
<beans xmlns="http://www.springframework.org/schema/beans"
xmlns:xsi="http://www.w3.org/2001/XMLSchema-instance"
xmlns:dubbo="http://code.alibabatech.com/schema/dubbo"
xsi:schemaLocation="http://www.springframework.org/schema/beans http://www.springframework.org/schema/beans/spring-beans.xsd http://code.alibabatech.com/schema/dubbo http://code.alibabatech.com/schema/dubbo/dubbo.xsd">
<!-- 消费方应用名,用于计算依赖关系,不是匹配条件,不要与提供方一样 -->
<dubbo:application name="consumer-of-helloworld-app" />
<!-- 使用zookeeper注册中心暴露发现服务地址 -->
<dubbo:registry protocol="zookeeper" address="192.168.33.88:2181" />
<!-- 生成远程服务代理,可以和本地bean一样使用helloService -->
<dubbo:reference id="helloService" interface="org.ggg.hello.service.HelloService" />
</beans>

然后往test里新增一个类,权当是测试:

1
2
3
4
5
6
7
8
9
10
11
12
13
14
15
16
17
package org.ggg.hello.service.provider;
import org.ggg.hello.service.HelloService;
import org.springframework.context.support.ClassPathXmlApplicationContext;
public class Consumer {
public static void main(String[] args) throws Exception {
ClassPathXmlApplicationContext context = new ClassPathXmlApplicationContext("consumer.xml");
context.start();
HelloService helloService = (HelloService) context.getBean("helloService");
String hello = helloService.sayHello("world");
System.out.println(hello);
}
}

这样,helloImpl的项目结构应该是这样子的:
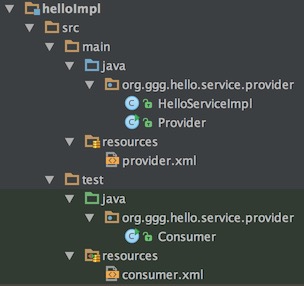
验证服务

运行这个Consumer类,应该就能看到Hello world啦。如果在运行Consumer之前把Provider停了,就会看见这样的错误消息:Failed to check the status of the service org.ggg.hello.service.HelloService

直接连接

Dubbo支持不用服务注册中心,直接连接本地的服务。这样的话测试起来就非常方便了。在consumer.xml里这么配置:

1
2
3
4
5
6
7
8
9
10
11
12
13
<?xml version="1.0" encoding="UTF-8"?>
<beans xmlns="http://www.springframework.org/schema/beans"
xmlns:xsi="http://www.w3.org/2001/XMLSchema-instance"
xmlns:dubbo="http://code.alibabatech.com/schema/dubbo"
xsi:schemaLocation="http://www.springframework.org/schema/beans http://www.springframework.org/schema/beans/spring-beans.xsd http://code.alibabatech.com/schema/dubbo http://code.alibabatech.com/schema/dubbo/dubbo.xsd">
<!-- 消费方应用名,用于计算依赖关系,不是匹配条件,不要与提供方一样 -->
<dubbo:application name="consumer-of-helloworld-app" />
<!-- 生成远程服务代理,可以和本地bean一样使用helloService -->
<dubbo:reference id="helloService" interface="org.ggg.hello.service.HelloService" url="dubbo://localhost:19880" />
</beans>

移除dubbo:registry,在dubbo:reference里增加本地的url即可。还是非常方便的吧,别忘记把服务先启动起来。

文章目录
  1. 1. 简介
  2. 2. 准备环境
  3. 3. HelloWorld
    1. 3.1. 服务提供者
    2. 3.2. 实现服务
    3. 3.3. 启动服务
    4. 3.4. 服务消费者
    5. 3.5. 验证服务
    6. 3.6. 直接连接